Showing posts with label ipad essentials. Show all posts

Wednesday, April 29, 2020

Sharing your iPad Screen during teletherapy

iPad apps can still be very useful in teletherapy even though you cannot really give cursor control. I discussed one workaround for this in this post using Bluestacks- an option you can experiment with. But since many iPad apps are Fairly Priced, Interactive, Visual, Educationally Relevant and "Speechie" (see my FIVES criteria info), and some of them are your go-to tools, there is still a lot we can do by showing them on screen (with the techniques in the video below, then screenshare in your teleplatform) and having conversations about what is seen, and having students make choices.

A reader and experienced teletherapist, Maureen Harper of GlobalSLPTherapy, put this very well and I am using her quote to me in an email with permission (she also contributed to a resource list I will be writing about tomorrow):

You are correct that using ipad apps limits the client from being able to directly control the app. As I have used ipad apps though, I have found them to be extremely motivating for the client to give me directions on what to do. They love being the "teacher". They have proven to be a great asset in expressive language development.

So, I'm not a great video-maker. I forgot even to shoot this in landscape, but it does the trick in offering a few updated options for showing your iPad screen in teletherapy. Email subscribers, here is the video.
For Mac: use the built-in free QuickTime application
For PC: Look at LonelyScreenReflector or AirServer (note these last two also work for Android devices)


Friday, December 1, 2017

Realistic Expectations, and some tips

Technology that we like can tend to go away.

It's just how it works. Most technology resources have an element of planned obsolescence. I wanted to write about this because with the launch of iOS 11 this fall, many in our field discovered that a good number of their apps no longer worked, i.e. they wouldn't launch.

Why did this happen? 
Apple introduced a higher level 64-bit processor to its devices in 2013 and at that time began encouraging developers to update apps that were built for the 32-bit processor. That was 4 years ago. So Apple gave developers plenty of time to work on securing a longer life for their apps. With iOS 10, users began receiving messages when launching old apps that an update would be needed and the app would not work with future versions of iOS. That line was drawn with iOS 11, and something like 180,000 apps (mostly games, followed by education apps, see source) ceased to launch once the device was updated to the newest version of iOS.

Another why, which I can say from being involved in app development, is that creating technology is very difficult and complicated, and these creations are not intended to last forever. Kudos to Smarty Ears for keeping all their apps, including the five I worked on, up to date. I have had to mourn many web resources over the years and I knew the day would come for some apps to buy the farm as well. Let's pour one out for the original Toontastic, now replaced by Toontastic 3D, which I also like but perhaps not as much, and Tellagami, for now.

I could not find a reference indicating how long tech consumers should expect resources to work--hardware or software. But I'd say it's reasonable for us to expect about 3-5 years, even if we paid for that resource.

Things happen. People move on. So should we. Should we expect a company that floundered so much that they were sold and reabsorbed, or just went away, to update its apps? These things are unfortunate and disappointing, but it is what it is!

What can you do?
First of all, if you haven't updated to iOS 11 yet, I recommended previously that you do so carefully.
-Check first to see if there are apps you absolutely can't live without, or whose data you need to extract somehow. Settings>General>About>Applications. If apps you need are listed in the "No Updates Available" section, take note of these.

The App Compatibility/Sadness screen

-Contact developers, if you want to go that route, to see if there is going to be an update. Probably if they are still in that bin, it's unlikely.
-If there are a lot of apps on this screen that you can't live without, wait awhile...but only until you figure out how to replace them in your workflow.

Let go. If you hang back on your operating system too long, you are going to be missing out on updates to other apps and new releases.

BUT, once you update, unfortunately those non-functional 32-bit apps are not deleted and just take up space on your device like an annoying shell. I had the additional problem of my iPad being nearly full after updating. After deleting a lot of items like old video clips and photos, here's the process I followed:
-I navigated to the above screen (Settings>About>Applications) and took a photo on my phone of the apps at top of the list.
-I considered if there were any apps I wanted to wait a bit more on, and kept those in mind.
-I navigated to the easiest place to delete apps, Settings>General>iPad Storage

The App Storage Screen- Tap any app to Delete it. You can also find the icon on the home screen, tap-hold until it jiggles, then tap the X. Apps are hard to find this way, if you have many apps.

-This screen takes a moment to index, but lists all apps on the device. Most of your stragglers are probably going to be down at the bottom of the list as in my observation the non-updaters are smaller apps that performed discrete functions. Scroll down and tap on any app and it will bring you to a screen where you can tap Delete App. WAIT for Settings to kick you back to the storage screen rather than tapping Back or you are likely to cause a freeze.
-If Settings freezes anyway in this process, wait awhile or Force Quit it.
-I referred to my photo and deleted apps that I could let go of (most)
-Then I navigated back to the No Updates Available screen and repeated the process, after deleting the previous photo from my iPhone and taking a new one, until I only had a few apps I'm holding out for. Remember that if a deleted app is updated in the future (you'd have to check the App Store to find out if it reappeared), you always can reinstall.

This process was, frankly, a major pain in the ass. But having gone through it, I am happy to have a cleaner device and to have purged dozens of apps that I really wasn't using anyway. As I have 2 iPads, following this I backed up the "clean" one to iTunes, updated the 2nd one to iOS 11, then reset it and restored it from the backup of the clean iPad.

Moving on!

Thursday, September 28, 2017

Approaching iOS 11...carefully

For those of us that depend on our iPads to any extent in our work, a new operating system brings exciting new features, but some trepidation. As it should. Apple released iOS 11 two weeks ago, and it comes with some cool updates particularly for the iPad. Note also that not all devices currently "out there" will be prompted to install (i.e. "can run") iOS 11. This is just a function of the cycle of upgrading (and on the downside, the march toward obscelence). To see if your device can run iOS 11, check this list. Remember you can always google your device model number (on the back, wicked small) to find out what generation your device is. If you are not able to update, don't stress. This doesn't mean your device is useless at all. You may run into apps that you cannot download due to your use of an earlier operating system, or hear of updates to apps that are similarly not available to your device. Just keep on keepin' on and think about upgrading to a new device eventually. The 5th Generation iPad is quite reasonably priced at $329.

It seems that iOS 11 was a line in the sand Apple needed to draw with developers who have not updated their apps in some time, and they need to update their apps for compatibility or they will simply not launch once you have installed iOS 11. This is the real reason I wanted to write this post, to advise you to wait a bit before updating (a month, maybe?) and check compatibility of your indispensable apps before you update. They've made this really easy to do! THIS POST EXPLAINS HOW.

I went through this list and checked, and for me there was nothing I couldn't live without except the original Toontastic (I'm ok with the new Toontastic 3D, but before updating I need to save some animations I made in the original as I often talk about the applications of these types of apps in workshops).

Unfortunately, if the developer is no longer interested on keeping their app functioning, apps that remain incompatible will just take up space on your iPad. Check out these different ways to delete apps- I particularly like the 2nd way of deleting from Settings.

I look forward to talking about the cool features of iOS 11 in the weeks to come.


Saturday, January 14, 2017

Annotating Photos in iOS 10

Annotating a photo, or marking it up with text, highlights or shapes has many uses in language, social and executive function therapy. I have previously written about this topic with regard to Skitch. So, Skitch is no more, and though its functions were incorporated in Evernote, getting to them is almost too complicated to talk about here. The good news is that you can now annotate photos without a specialized app, because these features have been added to the Photos app for iPad and iPhone.

But first, some bad news. These features are part of iOS 10, which came out this past fall and was where Apple finally drew the line on the iPad 2. The iPad 2, now a 5 year-old line, cannot be updated to the latest version of the operating system. So...if you want to continue to be able to ride the tech train and you have an iPad 2, you might want to consider an upgrade. Not only for features available on the newest operating system, but also because as your operating system falls behind, so will your apps, and you'll soon find yourself not being able to install certain apps as they come out. I recommend the Gazelle service, which provides you with cash for trade-ins of old devices. The iPad Air 2 is a good model for clinicians to consider.

How to find out what model iPad you have.

How to find out what operating system version you are running.

How to update your iPad operating system.

Once you are up to date with iOS 10, you'll be able to annotate photos right in the Photos app. This will apply to photos you take with the camera or photos you save from Safari. Searching and saving photos from Safari brings you endless contexts for therapy, including finding images that scaffold language about curriculum topics.

Once you take or find an image you would like to add words or annotation to, you might first want to duplicate it. This would allow you to save the original and annotate a duplicate--especially useful if you may want to complete the same activity with multiple groups.

To Duplicate a photo, view it in the Photos app and tap the "Share Square."


Then tap Duplicate.


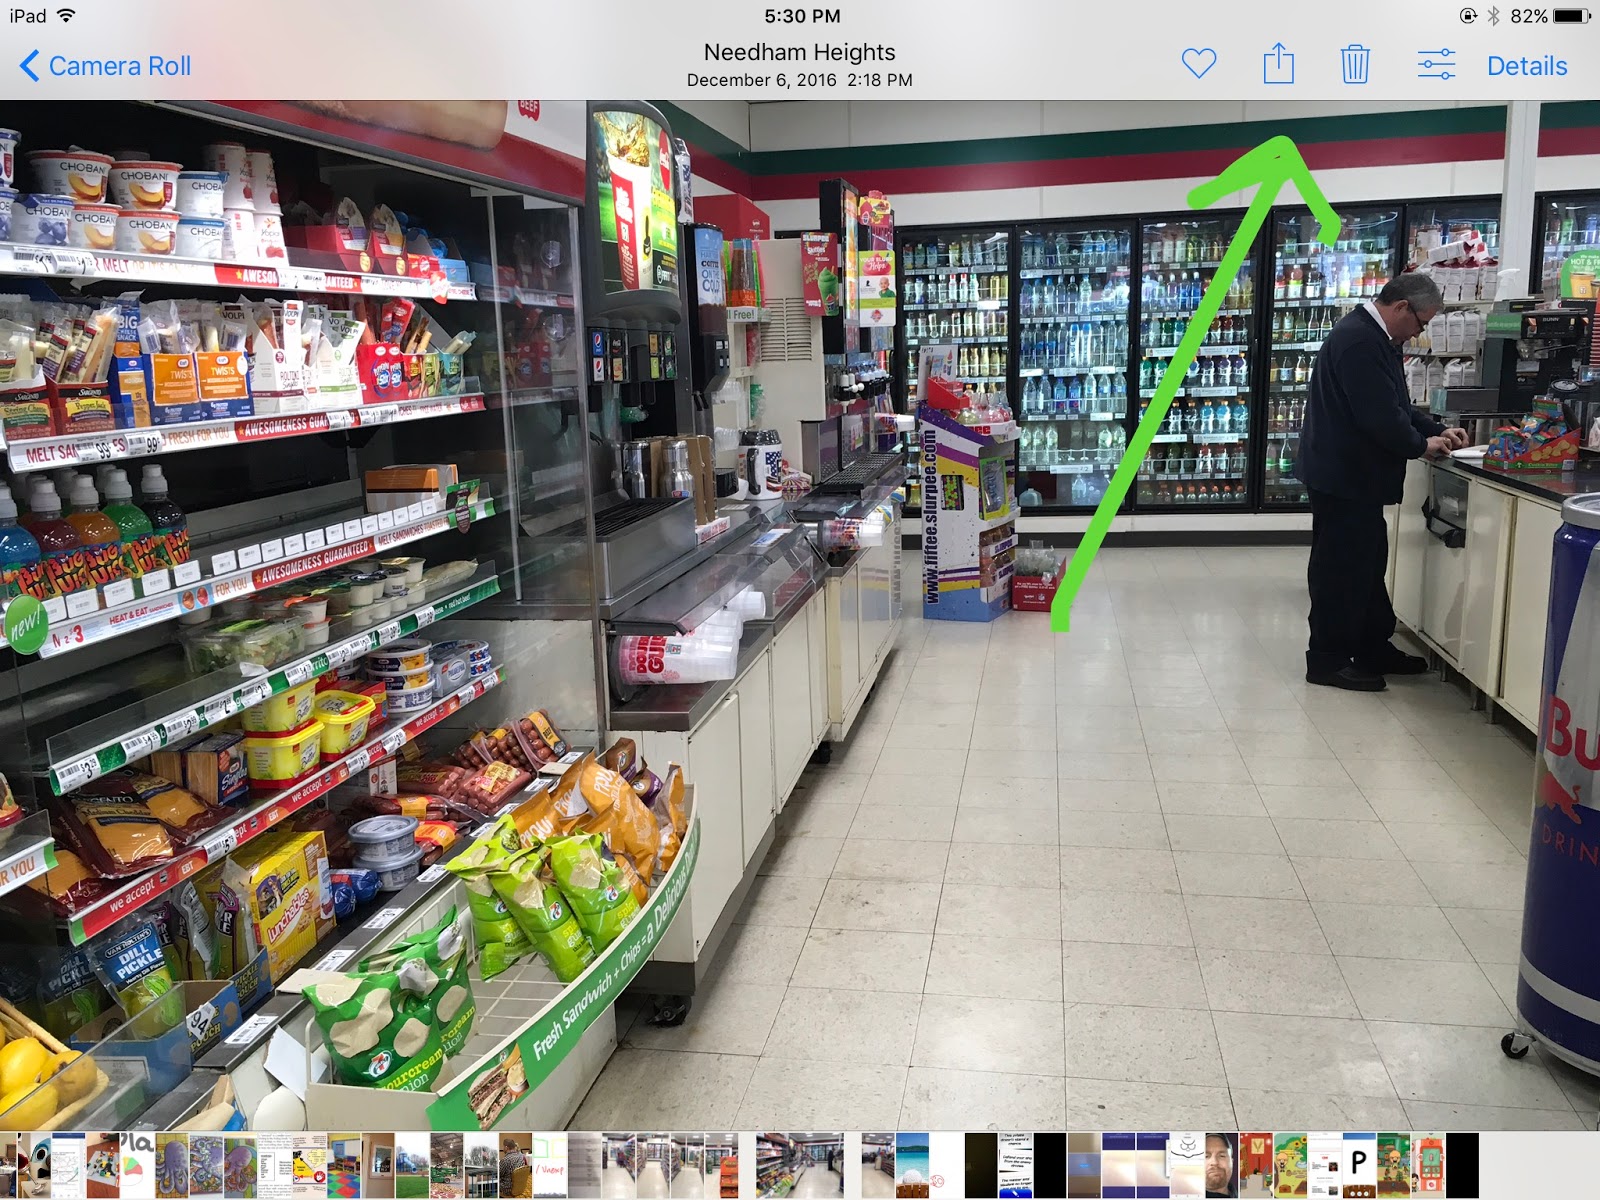
Now you will have two versions of the image, one of which you can annotate. To get started marking up the image, tap the "sliders" Edit icon in the upper right corner (next to Details). At the bottom of the menu on the left, tap the "..." icon, then Markup.


From there it is pretty self explanatory--you can familiarize yourself with the bottom menu, and how to add pen marks, change color and line thickness, add text and change its color, size and font.


In this case I was using this feature to make a visual activity with students before we took a community trip to 7-11 to get a snack. The activity aligned with Sarah Ward and Kristen Jacobsen's situational awareness "STOP" acronym-- Space, Time, Objects and People.

For more ideas on annotating photos, you can check out my linked article in the first paragraph of this post. Those ideas pertained to Skitch, but you can now do them right in the Photos app with iOS 10.

Friday, March 4, 2016

A Simple Idea: Helping technology work for you, not against you

I recently started individual therapy with a little friend who I also see in a group. In this group, we have used social pictures to build situational awareness with strategies such as Ward & Jacobsen's STOP acronym (Space, Time, Objects, People). I continue to find my iPad very useful for this as one can find and save pictures easily, and when displaying from the Photos app, it also serves as an engagement tool.

However, kiddo has a cute little habit of sweeping the picture to the next or previous one when the group is discussing pictures. This seems to be hysterical for some reason, and it can result in a "Silly Tornado (per Social Thinking®) for the rest of the group, and a Yellow Zone for me.

In individual therapy, we are working on comprehension and starting out the Visualizing and Verbalizing® program, and I saved a simple kid-oriented picture of a child on a bike to work on introducing the structure words for describing a gestalt. The past behavior occurred to me and I wondered if Guided Access would allow me to disable sweeping to another picture. It does- simply toggle the Touch switch off at the bottom of the screen and, no sweeping!


I admit to a little self-satisfaction when there was in fact an attempt to "follow one's own plan" and sweep the picture, but it also allowed for a quick teachable moment about why that restriction needed to be put in place, and what to do in the future to earn more trust from others. And we focused on the activity with no power struggles.

For instructions on how to use Guided Access, click here.

Thursday, January 22, 2015

Add Custom Keyboards to your iPad in iOS 8

iOS 8, among other enhancements, brought the ability to add 3rd party keyboards to the operating system. Previously, though some modifications of the keyboard were possible, we had little choice in customizing keyboards for use with learners of different ages and styles.

With iOS 8, keyboards are searchable and downloadable from the App Store. With a few taps in the settings app, they are made available any time the keyboard is visible. Some of the most interesting educational keyboards are being made by AssistiveWare, creators of Proloquo2Go. Among these are Keeble ($14.99), a keyboard for adults with visual and physical impairments, and Keedogo (1.99/4.99), a child-friendly keyboard!

Keedogo has a look and feel that will make your young students want to type! In addition, the keyboard can be customized to offer more extensive word prediction choices and ABC or Querty layout.

After installing Keedogo from the App Store, open the Settings app and navigate to the General>Keyboard section. Tap Keyboards>Add New Keyboard and Keedogo will be available under Third-Party Keyboards. You will need to enable Full Access in order for the keyboard to work. To see this process on video, see this tutorial.

From any app that uses the keyboard (remember that the keyboard only appears when the context is one in which you would be typing), you can then tap the Globe symbol to switch between your available keyboards. In this way you can have Keedogo available when you want it, and switch to the grown-up keyboard when using the iPad yourself.


A view of the Keedogo app being used with the Pages word processor. Tapping the Globe icon allows you to switch between the keyboards. 


Tap the 123 button and then the Cog key to customize the Keedogo keyboard's theme, layout, word prediction and other features.

If at any time you decide you want to delete the Keedogo keyboard, navigate to Keyboards in the Settings app and sweep left to delete Keedogo. You can always reinstall and enable it later.

Thursday, January 8, 2015

iPad Essentials: Speak Screen and Speech Options in iOS 8

Many people are not aware of the many assistive technology (and engagement-enhancing) features that are built into the brain of the iPad--iOS, its operating system. In talking to groups out and about, I am aware that many people have been afraid to update their iPad to iOS 8 for fear it will slow things down or perhaps explode. Yes, there are some hoops you need to jump through possibly to make space for the update, but I would really recommend it at this point, even for the iPad 2s (I assist with a fleet of them at a small school and have not noticed a difference in performance with the upgrade). The cost of continuing to wait is missing out on updated apps designed for the newest operating system, as well as the feature I will describe in this post.

iOS 8 has added a new iPad Essential- improved ease of use of text-to-speech tools. Text-to-speech, or the ability to have the device "read" text on screen, has been in the iOS for some time, but previously in a manner that required you to "select" the text, which requires some tricky tap-and-hold gesturing. iOS 8 has brought a new feature called Speak Screen, which is much more easily activated with a two-finger sweep.

First, you will need to turn on the feature:
1. Open the Settings app.
2. Tap General, then Accessibility, then Speech.
3. I like to keep my settings as follows, which allows me to access both Speak Selection and Speak Screen, at a slow speaking rate, along with Highlight Content (a feature that promotes literacy development).


iOS 8 also brought new choices under the Voices menu above, where you can now select the more natural sounding Alex voice (he takes breaths and uses more inflection). Be aware that the voice, if downloaded, takes up 869 MB on your device.


Speak Selection, and now Speak Screen, can be activated on any page that displays selectable text- so any webpage in Safari or other browsers, iBooks, Kindle, and some other apps. In Safari, it is helpful to use in conjunction with the Reader View. This view removes clutter (which could be "read" by the text-to-speech function and become auditory clutter) and displays only what is on the page. Note that this is not available for every webpage but only where the "lines" icon is displayed. 


So, tapping as shown above...


...transforms the page to a simpler view as shown above. Once Speak Screen is turned on in your settings, a two-finger sweep begins reading the page with your selected voice. Use the menu to decrease or increase the speed, rewind, go forward, or pause, and tap the X to dismiss it entirely. Note that if your iPad is Siri-enabled (iPad 3 or later, iPad Mini), you can also activate Siri and say "Speak Screen." 

These features are critical assistive technology for SLPs and teachers to know about, but also serve as therapy and engagement tools:
-Use text-to-speech within word processing apps or the Notes app to help students learn to edit their work more accurately. I know I am a better editor when I hear my text read aloud.
-When presenting text to students, use text-to-speech just to give them a break from your voice, or as an auditory comprehension activity. I know my students appreciate it when I shut my yap for a minute or 2!

Watch Luis Perez' quick video here for a step-by-step look, and see all of his great accessibility resources on his website. A quick view here also lets you see the gesture to activate Speak Screen.


Thursday, May 8, 2014

Re-usable Images!

As SLPs and other educators delve into creative visual tools, it opens up a world of language opportunities for our students. Creating videos, animations, books, comics, and other products is always a language process, and we can scaffold the use of many strategies while using these tools. However, using visual creation apps often requires images, and there is more than privacy at stake in this matter. We also must consider copyright and fair use.

As a general rule, using pictures saved via a Google Image search is going to be fine if what you are creating is staying on your iPad and not being republished or widely disseminated. For some examples, you're OK if you have saved a Google Image for educational purposes and you:
-Mark it up with photo annotation tool Skitch, save it to the Camera Roll and/or print it for use with the student or display in a classroom.
-Add it to a visual made with Custom Boards (which also has a built in Google Image search).
-Use it in a social story of which there are one (or "few" according to the confusing guidelines) copies.
-Add it to an album in the Photos app and only use it there.

We have to consider where trouble with copyright could occur on somewhat of an app-by-app basis, or even via some "if/thens" within a given app. For example:
-Toontastic, a wonderful animation app, allows you to add backgrounds from the Camera Roll, making for unlimited contexts for storytelling. If you have saved a Google Image without attention to copyright and send your completed toon containing that image as a background to Toontube, the app's optional sharing site, this is an issue. However, the app also has the option to just save toons within the app or to the Camera Roll, which is OK.
-Tellagami, a great talking avatar app, has a similar background image capability. Save your creation to the Camera Roll, and you're good. Upload that video to YouTube, and you're not.
-Many e-Book creators such as Scribble Press and My Story allow you to share your books, but only by first uploading them to their websites. This is a problem if you (or students) have saved images indiscriminately. Unless using images licensed for reuse (see below) share the book only to iBooks on your device or use a different app such as Book Creator, which allows you more diverse sharing options.

The purpose of this post is ultimately to offer solutions, not just scary problems. So if you know your work is to be shared (emailed to many parents, tweeted, posted to a website, uploaded to an app's sharing "gallery" of any kind) when it is completed, simply start by obtaining images licensed for reuse, along with citation information. Two easy ways to do this:

Google Images
Wait, didn't we just say use of Google Images is potentially problematic? Not if you customize your search to find images labeled for reuse.

This option was recently added to Google Image Search. Click/Tap on Search Tools, then Usage Rights, and filter by "labeled for reuse"


When saving your image, also note the source so that you can site it in your work with an "Images From" section or some sort of credit.


Flickr Creative Commons
I like Flickr Creative Commons for its wide selection and ease of identifying the source of an image for citation. This resource requires a few extra steps to get to a downloadable/save-able/citable image:

-Click/tap See more on the license level you want to use- I generally use Attribution.
-Search for images, tap or click on one you like to see it in detail
-Tap the 3 Dots, then All sizes
-Tap and hold on (if on iPad) or right-click/ctrl-click image to save. Note creator at the top of the page (e.g. johnsmith on flickr) so you can provide attribution if republishing, and use a link if possible.


image licensed for reuse by scott1346 on flickr
Above, an example of citing an image when republishing!

For some more background on this issue and these strategies for obtaining images, check out Common Craft's great video on Copyright and Creative Commons.


Wednesday, April 2, 2014

iPad Essentials: Window Shopping in the App Store

While recently conducting a few "iPad 101"-style workshops for educators and clinicians, including a webinar for ASHA available on-demand, I have been talking a lot about finding and getting ideas about helpful apps. I discussed this in a post a bit back mentioning resources including Smart Apps for Kids, Yapp Guru and Apps Gone Free, but it's also worth noting the "window shopping" one can do in the App Store app itself.

Although the information the App Store provides is far from comprehensive (I always recommend looking at app demos on YouTube before purchasing) and reviews can be quite skewed or unhelpful, it gives you a good visual "first pass" to new ideas. The App Store has also recently improved in its organization, which primarily is what we'll focus on in this post.

I use the term "window shopping" because the App Store is essentially a storefront from Apple and an avenue to display things that look attractive together-- collections! Upon opening the App Store, the Featured tab is an area that is a good idea to check out about once a week, primarily because Apple's "App of the Week" is always free. If Apple has singled an app out in this way out of the zillions available, you can be assured it is pretty neat-o, and many of the Apps of the Week are kid- or education-related.


Note also that the menu at the top of the App Store leads you to some relevant areas for SLPs and language interventionists. Tap Kids (and then an age range) and this will bring you to educational, creative, or game-based apps that may be repurposed for therapy and learning activities. 


Under the More tab, there are several areas to explore. The Education area has great curriculum-based apps that can be used to provide visual and interactive experiences with content...


...and includes terrific Collections, among them the Apps for Every Grade Collections- especially helpful for those who struggle to find relevant apps for Middle and High Schoolers.


The More tab in the top menu also brings you to the Medical category, which has many apps relevant to clinical work.

Exploring the App Store will lead you down new avenues and provide a great opportunity to hone your evaluation skills: which apps seem to be FIVES-Friendly: Fairly Priced, Interactive, Visual, Educationally Relevant, and "Speechie" or Specific to intervention objectives?

Happy window shopping!! Let us know if you find something good...

Thursday, January 2, 2014

iPad 101 Webinar

If you feel like you could use some strategies to get your feet wet with your iPad, or know others that could use a contextual introduction to increase their comfort with integrating technology in their work, please sign up for or share my upcoming webinar for ASHA. The content of the webinar will be presented as sort of a "week in the life of an SLP with an iPad," chiefly geared toward the school setting but generalizable to other areas of practice.

The information is below, and you can register here. The webinar will be broadcast live on 2/16/14 and available as a replay for the following year.

This webinar will familiarize you with the basic functions of the iPad in order to more effectively use its associated tools for productivity and clinical application. Sean Sweeney, speech-language pathologist and instructional technology specialist, will demonstrate key tricks for applying the iPad in clinical settings, including use of the Camera and Photos apps, Calendar, Notes, and web-browsing with Safari. This webinar will include an exploration of accessibility settings, strategies for app evaluation, and free or low-cost ancillary apps to facilitate your integration of this powerful tool. The webinar will present strategies applicable in the context of a typical school week, but those suggested can be generalized to other settings. 


Thursday, December 12, 2013

When apps go away, be creative!

I wrote about an app some time ago, and it is one of my favorite apps to revisit during this season of giving (even though Hanukah and Christmas were quite far apart this year), so I wanted to mention it again. The Gift Wrap App was used to "wrap" any image from your camera roll, and allow someone to "unwrap." It therefore can be used for a play and "sharing imagination" activity (see the work of Social Thinking®) to target a variety of language objectives, as well as social behaviors around receiving gifts. It also was a nice app to use to expand your comfort level in quickly saving and using images within apps.

Here's the thing: it's no longer available in the U.S. Store, as I discovered when I sat down to write this post. Crap! Though I have it on my iPad, you can't get it, at least for now.

I couldn't find anything else like it!

EDIT: Rachel Smith on Twitter (@lancslassrach) alerted me to the free Wrapped app (works better on iPad). It's a little less slick but serves the same purpose/features (see below)

but when I sat and thought about its process and features:

1. Save a photo of a gift using Safari
2. Add it to the app (or have student do steps 1-2) so it is "hidden"
3. Practice all the verbal and nonverbal behaviors that go with a gift exchange

...I realized that All4MyChild's Bag Game ($1.99, also available in the excellent Social Adventures app) could be used in just the same way! Just save the pic to the camera roll in Safari and choose "Hide Photo." Notice my racetrack pic on the camera roll.


The wrapping may be simple, and you can opt to skip the guessing game, but the idea is the same. The receiver can pinch to open the gift, and there you go!


Language Lens:
-Use this app to target the concept of "People Files" (per Social Thinking, also well explored in Thinking About You, Thinking About Me and the new Superflex Takes on One-Sided Sid, Un-Wonderer and the Team of Unthinkables), the expected knowledge we accumulate about others and use as a basis for interaction.
-Have kids use descriptive language and causals while selecting the photo from Google Images.
-Target verbal and nonverbal interactions while one child "gives" the gift to another by handing over the iPad, and on the receiving side as well.
-This activity also pairs well with Braidy/SGM® Character Maps about what we know about another person- likes and dislikes, as well as the Incredible 5-Point Scale. I created a 5-Point Scale of Gift Receiving with my students:


Common Core Connection:
CCSS.ELA-Literacy.SL.2.5 Create audio recordings of stories or poems; add drawings or other visual displays to stories or recounts of experiences when appropriate to clarify ideas, thoughts, and feelings. 
CCSS.ELA-Literacy.SL.2.6 Produce complete sentences when appropriate to task and situation in order to provide requested detail or clarification.

Happy Holidays to you all!

Want to give me a gift? Vote for me for Best EdTech/Resource Sharing Blog in the 2013 Edublog Awards!

How?
Click on the link above. Find "Speechtechie" and click on the arrow up button in lower left.
Sign in to list.ly with Facebook, Twitter or Google. You can "skip" letting listly post for you.
You haven't voted yet. Click the arrow up button again in my "rectangle." Now you've voted.
Voting is open until 12/18. Please also support other SLPs in the running. You can vote for all of us, even multiple resources in a category, but only once each. Thanks!


Wednesday, November 27, 2013

Itching to upgrade? I did!

Sometime after the release of iOS7 I noticed my 3rd generation iPad was beginning to behave strangely. Especially when updating apps, the device would sometimes do a sort of ominous curtain-down thing (I imagined a sad noise accompanying this) and shut off of its own accord. It would also reboot itself randomly at other times and lose its desktop background, instead showing a deathly black. It was sending me a message.

My 64G 3rd Gen was almost full anyways (remember that apps are a big part of what I do, I am not recommending that regular users invest in more than the 32-64G devices), and I had been waiting for the more significant announcements in October: a Retina Display iPad Mini and the 5th Gen iPad, which turned out to be named the iPad Air. This post is not meant to cause regret/iPad envy in any way; my iPad 2 has continued to work great with iOS 7. I think it is telling that the 2 is still sold, but the 3 has been off the market since last year. It has become somewhat of a white elephant in the line.

So, a tip that this post is really about: you are not stuck with your old iPad (if it is your personal device) forever. You have a number of options- a) continue to use it as an extra device b) hand it down to a family member c) sell it within your school district and d) use a buying service such as Gazelle. I had a positive experience with Boston-based Gazelle when trading in a couple of iPhone 4s. The process is so simple and pleasant! The Gazelle website lets you select your device model and condition, and you are provided with a quote. You can accept it or not- remember that you probably could get more money for the device if you choose more time-consuming ways to sell it. Once you agree to the price, Gazelle sends you a really cute box with everything you need to simply drop it at the post office:


OK, Maybe I like it just because it is orange.

Another tip- I prefer to back up and set up my devices from iTunes, so I don't run into iCloud storage issues. My process included deleting old backups, since there were so many I couldn't tell which backup was still relevant and these take up space on your computer. I then backed up my iPad 3 to iTunes as it had the most relevant data and folder sets. When I bought my new iPads*, which I bought from the Apple Store app and then did the whole cool "check-in" thing as I approached the store, I set up the new iPad Air by restoring from that old backup through iTunes. That way it kept all my data, apps, and folders. I am keeping the Mini simple for now and just gradually putting apps on it. Now I am ready to send the old ones in to get my cash ($230 for the 3rd gen 64G with Wifi + 3G and $200 for the iPad 2 with WiFi only), though I have a few weeks before I have to do so.

My new guys, fast, glitch-less and beautiful:


*This all may seem extravagant but it's important to emphasize that I make part of my living doing technology consultations, so I consider it my responsibility to have not only updated equipment, but also a backup device. It's also all accounted for at tax time. Maybe one of these could be on your holiday wish list!

Tuesday, October 15, 2013

iPad Essentials: 4 Tricks to Find Apps

The App Store is huge and overwhelming. It's important to have some strategies to find apps; here are some I commonly share in workshops and thought you all might like to know about!

1. Make sure to look at iPhone apps in the App Store App, if you can't find the app you are looking for.

At times people hear about an app and become frustrated because they cannot find it in the App Store. This could be because it is an app made for iPhone, not iPad. iPad (or "universal") apps are more ideal as they are designed for the screen, but apps made for iPhone still are usable on iPad in what is called "compatibility mode" (tap the 2x in the lower corner of the screen and it will enlarge to almost fullscreen).

When searching for an app, if you see a "no results" message, tap "iPad only" and then choose "iPhone only" to check if there is an iPhone version available (in iOS7). If you are still on iOS6 you can toggle from iPad apps to iPhone apps at the top-center of the search results page in the App Store app.


 In iOS7

2. Search for the app using your Safari app

Google is more forgiving about mistakes as you are searching for app names than the App Store. If you search in the Safari app for the app name using Google, often the direct link to download the app will come up.

Look for the result that has an iTunes.apple.com address and tap on it. This will open up the App Store app and link you directly to the app.


3. Be aware of app sales!

There are a number of resources that inform us of app sales:

Apps Gone Free- is a free app from the folks at App Advice, an excellent blog. You can check it each day and it lists apps that have become free for a limited time. The apps usually are priced higher than free, and are required to have a 3-star or greater rating in the App Store, so they generally are of good quality.

Moms With Apps' App Friday- each Friday, family-friendly apps are set to free or reduced price. Check the Download Center to find out which apps are participating.

Smart Apps for Kids- this website also provides information about daily "Good Free Apps" and is a great source of app news in general, having SLPs and educators directly involved. You can view their page directly or follow their Facebook or Twitter feeds.

4. Use other App-Finding Apps.

Kindertown and Autism Apps are both free, educator-moderated resources of apps within certain subject or goal areas. 

Do also watch out for updates on the ultimate app-finder for therapists: Yapp Guru! This website is currently in beta, but the SLPs behind it keep an active and helpful presence on Twitter and Facebook, so follow them for news on what's to come!

The resources in #s 3-4 present a good opportunity to do a quick FIVES criteria analysis in your head before downloading. Happy Hunting!


Friday, September 20, 2013

Overview of iOS7 for SLPs and Educators

You may have heard that a new version of iOS- iOS7- is available! This gives your iPad operating system a new look and feel and additional features. This new operating system is accessed (for free) in your Settings app under General>Software Update for iPad 2s and later, including the mini. I did my updates after a backup and "over the air" (i.e. through Settings), rather than connecting to iTunes via a computer, and it went smoothly, though it took about an hour, so be sure to allow that time.

You can of course delay updating for some time, and conservatively, this may be a good idea in order to allow developers time to make any necessary updates.

Here are some recommendations on steps to update.

I made a quick-and-dirty video to get this information out there, so forgive the length (there was a lot to show) and a little bit of choppy editing:


The video covers the following:

Look and Feel- the OS has a cleaner, minimalist look, with fewer references to real-world objects such as notepads, torn pages, and leather stitching (skeuomorphism). The icons reflect this, though with a wacky color palette. There are also differences in the animations and gestures used. I left out that iOS7-aligned apps now use a sweep to left to delete. MOST of your apps will behave the same way they did before the update, but look for apps to update to be aligned with iOS7. Not everyone loves the new look and feel, but it does represent steps forward in design and function. Particularly the reduction of skeuomorphism is an effort to advance users from the days of "push here" and "Hey, the app looks like a notebook." Megan Sutton and I were discussing iOS7 and noted that clients and students may need additional training to remember what to do with their fingers, particularly those with language and memory impairments!

Folders- the amount of apps you can now place in a folder is unlimited, rather than 20 only, so you can combine your categories that have multiple folders of apps.

Spotlight- the app searching feature is now available by sweeping down from about the center of any home page, so you can find apps when you need to, faster.

Control Center- many features can be turned on or off by sweeping up from the bottom of the screen, rather than going into Settings. The video shows how to turn off Control Center within apps so that students do not become confused by activating it within an app.

Multitasking Bar- now provides preview cards of what each app screen currently looks like, and apps are force-quit by a sweep up in the Multitasking Bar. Fun!

Safari- the web browser has been redesigned so that you can search and enter web addresses from the same unified bar, and Shared Links can be viewed if you sign into Twitter in your Settings app.

Siri- for 3rd gen iPads and above, Siri has improved voices including a guy!

Updates- app updates can now be run automatically, but I recommend keeping these manual (in Settings> iTunes and App Store) so you know what the new features are and can pick and choose.

Parallax- kind of a throwaway feature, the apps on your home screens now have a 3D feel when you move your iPad around. This can be turned off if causing students to stim or for those with visual impairments (under Accessibility>Reduce Motion).

Accessibility- see Interactive Accessibility and Luis Perez' YouTube channel for information on new switch access.

For the sake of time, I did not cover the new Camera interface or editing features for photos (filters!) but do check these out.

For more technical notes on iOS7 and education, including the AirDrop file-sharing feature handy for collecting student work in a classroom, click here.

Happy updating!


Monday, July 8, 2013

Thinking about Social Thinking®, and the iPad Essential of Album Creation

I am really happy to have been asked to be part of the Social Thinking® Blogging Team, a group of folks who will be writing about some of the products and conferences offered that are related to the Social Thinking approach, based on the work of Michelle Garcia Winner. We agreed that since this is a tech-infused place, I would be featuring some of the Social Thinking products over the coming months along with a technology tie-in. This aligns well with my experience in presenting at the Social Thinking Provider's Conferences about webtools and apps that, though not designed for supporting social cognition, can easily be leveraged to that end.

The folks at Social Thinking asked us to start with Thinking about YOU, Thinking about ME: Teaching perspective taking and Social Thinking to persons with Social Cognitive Learning Challenges, 2nd Edition. This is perfect, as this book is where I would recommend anyone starting when exploring implementation of Social Thinking in your practice. Summer is a great time to pursue new avenues in your practice, or take time to deepen your knowledge of strategies you have already started applying.

I first saw Michelle Garcia Winner speak over 10 years ago, when this book was published in its first edition. One can think of it as THE core book for Social Thinking, an essential approach in working with high-functioning students with social learning issues. Social Thinking is all about language and concepts that teach students the why of social interactions. The essential ideas and strategies can be taught and then practiced in individual or group sessions, and the vocabulary related to social behavior can then be conveyed to parents and teachers for carryover and reinforcement in situations across the day. Thinking about YOU, Thinking about ME gives you an overview of social cognition and levels of functioning, but also an entry point to some key intervention strategies, such as:

- The Four Steps of Communication: concrete, universally followed steps to approaching others and "hanging out" in a group.
-Developing cognitive vocabulary (what it means to think, know, or guess) through use of videos such as the Wallace and Gromit series (I have also recommended Shaun the Sheep for this).
-Using video both as a feedback technique and as a group project to develop social behaviors in a naturalistic context.
-Social Memory and creating "People Files" about others both as an expected behavior and strategy to aid in initiating interactions.
-Specific language, visuals and goal ideas on teaching physical presence and awareness of how our bodies (and eyes!) should look when "staying with the group."
-A focus on conversational interactions through various strategies- using the "Add-A-Thought" and conversation tree, or Conversation Street Vocabulary describing how conversational behavior can mirror moves on the road.
-Social Behavior Mapping- an essential therapy tool when students have "graduated" from Social Stories™, can be used to teach any situation's associated expected behaviors and consequences.
-Strategies for building the foundations of self advocacy in students, i.e. knowing about their own IEP.

Besides providing information to get you started on all of these intervention strategies, Thinking about YOU, Thinking about ME contains another essential tool: the Social Thinking Dynamic Assessment Protocol. This is a qualitative assessment procedure I have found invaluable in the last several years.  I first started applying it in the school setting along with other colleagues, and the information provided as you work through it with students are essential to an informed assessment of social cognition (this book also provides analyses of norm-referenced assessments) and treatment planning. If you don't yet have the book, you can find some of this information (and many other free resources) on the Social Thinking website here.

That article linked above describes the Double Interview Task within the Protocol; in this task, the clinician interviews the student and makes observations of his or her conversational skills, then turns the table and asks the student to do an interview. This task is very telling! One aspect of the task involves asking the student to view and interpret personal pictures of the clinician. Can the student describe the context and the relationships between the people depicted? Does the student make "smart guesses" about you based on the pictures? Does the student recognize people shown in multiple pictures?

Here's where my tech spin on Thinking about YOU, Thinking about ME comes in. To do the Double Interview Task, you need pictures of yourself. Since many of these are exchanged electronically these days, and also to save the bother of collecting and having more materials around, you can keep your pictures in an album within the Photos app of your iPad.  Here's how you do it:

1. "Collect" your Photos

You may have a built-in collection of usable photos for this task on Facebook. Just save some where you don't have a "beverage."


Navigate to a usable picture in the Facebook app on iPad, and you can tap on the 3 Dots to save the picture to the Photos app.

If you have photos saved elsewhere, or can scan them on a computer, you can then email them to an account accessible in the Mail app on your iPad (to add Mail accounts, open Settings>Mail, Contacts, Calendars). Open the mail and tap and hold on the photo file, then choose Save to Camera Roll.


2. Organize an Album

When doing the assessment, you don't want to have to sweep through all your photos to locate the pictures you plan to show the student. You can facilitate this by creating an Album in the Photos app.

There are several ways to do this but I will show you my favorite way.
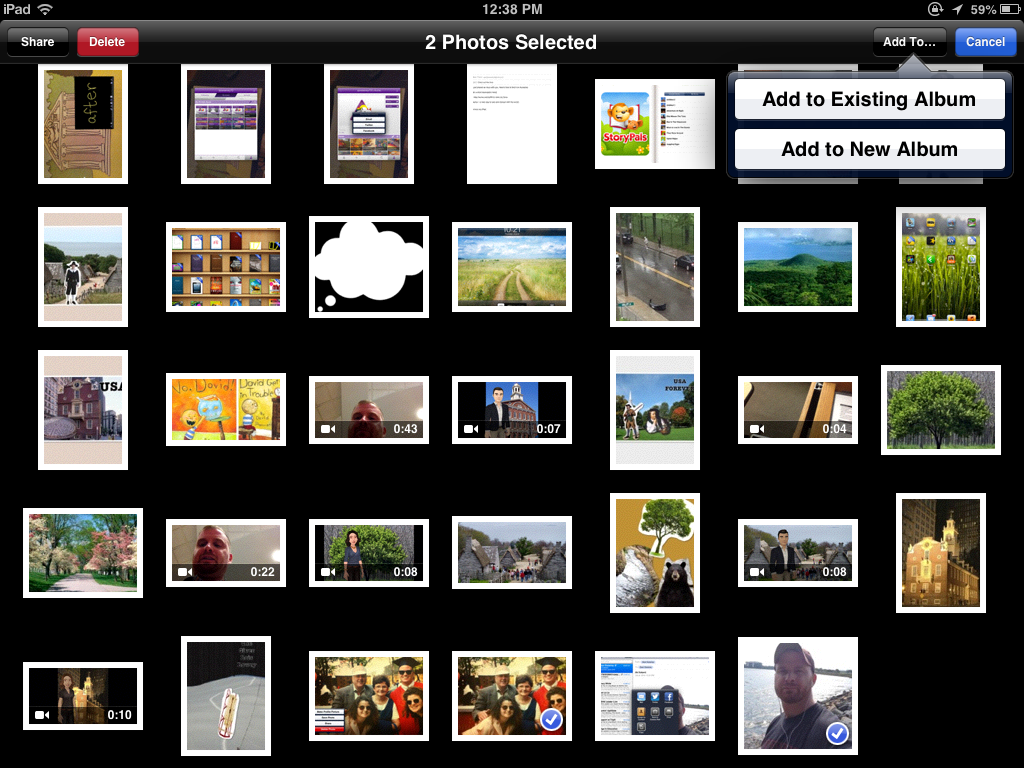
a. Open the Photos app and ensure that in the top menu, Photos is selected.
b. Tap Edit. Notice that the menu has disappeared and the words Select Items are displayed.
c. Tap the photos you want to put in your album.
d. Tap Add To...


e. Add to a New Album and Name the Album.
f. You will then see your Album under the Albums section of your Photos app.

If you would like to see this as a video, here is a good representation of the process (after more comprehensive screenshots).

I have found having my photos on the iPad is very convenient as it helps me prepare for these assessments, and it also adds an engagement factor for the student when they are asked to view the photos on the iPad.

I hope you do explore this book when you have some time this summer!

Disclosure: Author was provided a copy of Thinking about YOU, Thinking about ME. However, I owned dog-eared copies of both the first and second editions of this book already! The opinions are all mine.

Friday, April 5, 2013

iPad Essentials: Accepting Folders

I like icons.

I think it is one of the things that we all like about the iPad. App icons have a visual appeal that tends to stick with us, and we sometimes even look more closely at an app and consider buying it because of the icon. At least I do. It's like app fashion.

So, for a long time I resisted any significant use of folders on my iPad screens, and as a result, my iPad(s) became a total hot mess.

The issue is that you have a maximum of 11 screens of icons that will be displayed on your iPad. As you may know, this does not mean that you can only install 220 apps on your device.  The number of apps you can install is completely dependent on the capacity of your iPad (16, 32*, 64 and now 128G), the size of the apps you install and whether you also have a lot of photos, video or music on the device.

So, as you fill up those screens and enjoy the bright icons, you can always rely on the Spotlight search to help you find an app, which is what I did for some time.  However, once the 11 screens are filled, it can get a bit dodgy. Apps will still install of course (if you have space), but you will maybe forget that they are there.  When you do what I do, you have a lot of apps on hand, but even for the less insane people, we should try not to forget about relevant clinical tools that can become hidden in the netherspace of our iPad's brain (but are still searchable in Spotlight and listed in your Usage/Storage area of Settings).

I finally had to embrace folders in order to feel I had a better sense of my catalogue. There is a way to arrange all of your app screens, including the netherspace apps, by connecting to iTunes and clicking and dragging them all around from these grayed-out netherspace screens, but I found that cumbersome. Which is probably why I avoided the task for so long.

So here's what you do if you have a hot mess iPad with 11 full screens:

1. Take a look at your screens and start to conceptualize what your schema for categorizing them will be. You are an SLP (probably, if you are reading this), so you should be good at this. Keep in mind you can always change it up.

2. Start putting apps in folders. Succinct naming of folders is important, as folder names can only be so long before they get truncated in their center. So, your attempt to name a folder "Apps I like to use during 4th block" will result in a folder that actually is labeled as such:


3. Move each folder to screen 1 or 2 of the iPad and organize the folders alphabetically. This really helped me begin to process the overwhelmingness of it all.

4. If you have pretty broad categories, remember that each folder only holds 20 app icons.  No biggie, just add a 2 for the next one, 3 if you need another, though if you go beyond that you might want to consider more specific subcategories!

5. Soon you will start having empty space on your screens, because you have categorized many apps. How do you get the apps from the netherspace to show up? RESTART your iPad and they will pop up in the empty spaces! I did not know this! It was a glorious revelation.

6. Repeat until your iPad is much less crazy-making.

I have come to accept folders and realize that they facilitate my Zen, going from 11 screens of this kind of nonsense:


To this:


...which probably could be improved, but is much better and more of an example to the groups of people I work with on iPadness. AND, when you tap on a folder, you can still admire the icons inside.

As a side note- since I have a backup iPad for presentations, once Alpha iPad was pretty much set, I backed it up to iTunes by plugging it in to my Mac. I then plugged Beta iPad in and restored it from the iTunes backup of Alpha iPad. Note: if you do this, you will lose data stored in apps and photos etc. on the iPad you are wiping and restoring, so don't do that if it matters to you. Also, all the apps didn't come over for some reason, but the folders did, so that was great.

For some great posts on foldering, see Consonantly Speaking.

*If you are tempted to ask me which size iPad to buy, fair question. I'd recommend at least a 32G at this point. You will fill your 16G rather quickly, and there is no way to add memory to an iPad. Megan Sutton wrote more about this recently.

Thursday, January 24, 2013

iPad Essentials: iOS Mail App

The iOS Mail app is one that some avoid- perhaps not knowing how to use it, having privacy concerns or not seeing the reason why it is useful. I do find it an essential app for the purpose of file transfer, and often recommend that people at least add one account to Mail, even if its an account you create just for file transfer to and from your iPad. There are many iPad apps that allow you to share what you have created with the app; you might be interested in doing so to share with parents or colleagues or to email an item to print it from an account on a laptop or desktop. You would not be able to share this way unless there were an account added to the Mail app:

The Share button in the Photos app leads to this menu, from which you can email the photo (in this case an annotation in Skitch)
Additionally, as I have discussed here before, sometimes it is useful to email files TO your iPad, such as PDFs.  The process of accessing and opening such files is MUCH easier from the Mail app as opposed to navigating to your webmail in the Safari app.


So, how do you add an account to the Mail app? Open Settings, then Mail, Contacts, Calendars:


This screen also allows you to delete any accounts you have added.  Simply tap the account in question and there is a Delete Account button on the following screen.

To add a new account, tap Add Account.  The app makes this simple for us by allowing us to access protocols for common email providers:


Simply put in your username, password, and other simple information requested (name on account, name on account, e.g. "My Gmail") and you are all set.  Next time you go to share an item from an app, it will come FROM that account. If you want to move a file TO your iPad, mail it to that account and check your email in the Mail app.

Thursday, December 27, 2012

iTunes 11's New Code-scanning Feature

I am sure I am not the only one who received a few iTunes cards this holiday season. My peeps know my passion for apps. Additionally, I had taken advantage of a Best Buy deal that I'd encourage all to be on the lookout for periodically- on Black Friday iTunes cards were 20% off! These deals are also often available at BJ's, Costco, or Sam's, and when you add funds in this way to your iTunes account, it gives you a nice budget to stretch over...whatever period of time you choose.

Normally, the process of redeeming an iTunes code can be a bit of a pain for those of us with the best decoding eyes, but with the recent overhaul of iTunes, Apple has made this much easier. As long as you have a recently produced iTunes card that has a box across the code, when you go to redeem the code on a Mac or PC, you can scan it via webcam and it's as simple as this:

Super cool! It hadn't even occurred to me until I saw it while blog surfing that this new feature is actually assistive technology...it has been mentioned that this new code-scanning element will be of great assistance to the visually impaired and those with dyslexia.

So, be sure to update to iTunes 11, which is important software to have on your computer in case anything goes wrong with your iPad, and I still prefer it as a way to back up my devices rather than buying more iCloud space. Here's a nice tutorial.

Hope you are all having a wonderful holiday break!


.