Tuesday, July 23, 2013

Follow-Up on ASHA Schools: Tellagami

I had a terrific time attending and presenting at this past weekend's ASHA Schools Conference in Long Beach, CA. I have been to many ASHA Conventions (and will be presenting in Chicago, more info to come), but this was my first Schools Conference. It has a very different feel- more low-key and definitely user-friendly.  As presenters we were encouraged to engage our audiences and make our sessions as practical as possible, which I appreciated. I really enjoyed seeing the motivational, positive-psychology based opening session by Murray Banks, and sessions on executive functioning and instructional strategies for academic writing by Sylvia Diehl and Bonnie Singer, respectively. It was an honor to be invited and counted among the faculty of this great conference, and I would encourage you all to make it to this event at some point if you work in the schools.

I had the opportunity at the conference to present on one of my favorite topics: digital storytelling or content creation apps. For me, though not designed for speech and language, these apps serve as "blank slates" for us to simply create (for or with students) products that can target all manner of skills: academic language, concepts and vocabulary, narrative, expository text, sentence structure or social cognition. It all depends on what you ask the students to do.

A great example of these types of apps and always a favorite when I present it: Tellagami. This free app allows you to create a talking avatar (called a "Gami") and place it in context with any background image.


See Tellagami's YouTube channel for a few other ideas on how to use Tellagami.

Here's how to use Tellagami:

Photo Creative Commons Licensed for Remixing by HarshLight on Flickr
1. Save a background image using Safari. The app also has some pre-loaded contexts. Tap Background to load an image from the app or Camera Roll.
2. Customize your character's appearance (the app allows you to choose aspects such as skin color, hair, gender, clothes).
3. Choose an emotional state for the character.
4. Tap the Character button twice and you will be able to either type text for the character to speak, or record audio which the character will lip-sync.
5. When you are pleased with your creation, you can tap Share and save it to the Camera Roll as a video.

The app is super-simple to use and the results are often hysterical! Here are a few ways to think of Tellagami through the Language Lens:
-As the app allows you to place a single "speaker" in a context, it is a nice one to use to create "newscasts" or advertisements.
-In doing so, you can incorporate virtually any academic context by saving a picture and having a "reporter" avatar speak from that location.
-In turn, you can plan the creation using strategies to structure language such as story grammar or expository text structure, or use this opportunity to target areas of difficulty such as pronoun or tense use.
-Because audio can be recorded, the app can also be used as a motivating way to work with articulation, voice or fluency.
-From a social standpoint, you are limited to one character speaking at a time (though Tellagami kindly responded to me on Twitter that they are considering adding additional characters through an update). Nevertheless, the app could be used as another way to deliver a Social Story™ or perhaps an "advice column" on the expected and unexpected behaviors- based on the work of Social Thinking®- in a particular setting (which you of course would depict with a background photo).

I hope you enjoy Tellagami! The folks at ASHA Schools sure did!

What ideas do you have for using Tellagami? Let us know in the comments!

Saturday, July 13, 2013

Create Narrated Slide or Video Shows with Videolicious

I am giving a session on Digital Storytelling in speech and language intervention at today's ASHA Schools conference in Long Beach, CA, and thought I would feature one of my favorite tools in this genre.

Videolicious is a simple video creator- it allows you select photos or videos from your photo library/camera roll and talk over them, effectively creating a narrated video. What a great language tool- and did I say it's free? It's freeness comes with two limitations- videos are limited to 10 minutes, and the saving process sends your video to the service's website (unless you follow the directions below).

Videolicious is really simple to use. You will first need to have photos or videos in your photos app- either shoot them or save images from the Internet (again, see the directions below to avoid violating copyright). Once they are there, select them by tapping them in sequence within the app:


You are then given the opportunity to record a "Selfie" introduction to the video (you talking to the camera). You can select the option of using "mic only" so that you or the student do not appear in the video. As you record your narration, you tap the selected images or videos in order to time when they will appear in your video. Thus, a narrated slideshow.


Language Lens:
-You can use Videolicious to have students (including adults) practice describing, sequential language, storytelling, persuading- whatever form of discourse you would like.
-Videolicious, as it records audio of one speaking, is also a nice tool to work on articulation, voice, and fluency.
-As your project in Videolicious can include video, it can also be used for video modeling, having kids narrative the steps to social or functional sequences.
-Many creation apps are more about the process than the product. Use the process to help students to plan their language using a graphic organizer or script.

BUT!
Videolicious, if used exactly as designed, saves the finished project both to your photos app AND the Videolicious website. This presents several issues:
a) You don't want to be sending video of your students to the Internet unless you have explicit permission.
b) If you saved images from Google Images, they were likely copyrighted. These are OK to use in any project that stays on your iPad in the app itself or if it is saved locally to the Camera Roll (this is Fair Use), but not to be republished to the Internet. You can use tools such as Flickr Creative Commons or other Creative Commons search websites to save the photos. You should still site them in some way, either orally within the video or by creating a text image (maybe with Doodle Buddy) attributing the image.

OR
...you can avoid publishing the project to the site by following these steps (given to me by a Videolicious support person):
1. Create your video. Don't tap Save.
2. Leave the Videolicious app and turn on Airplane Mode in the Settings app of your iPad. This disconnects your iPad from the Internet.
3. Return to Videolicious and complete the steps of saving the video. This will save it to the Camera Roll (Photos app) and NOT the site.
4. When saving is complete, tap the Share button (arrow coming out of the square) and Delete Video. It will remain in your photos app but then the app will not attempt to upload it when you turn off Airplane Mode.


5. Go back to the Settings app and turn Airplane Mode off.

This does seem like a lot of steps, I know. Nevertheless, this is one of the easiest and best apps I know of to make a narrated video, so I still highly recommend it.

Monday, July 8, 2013

Thinking about Social Thinking®, and the iPad Essential of Album Creation

I am really happy to have been asked to be part of the Social Thinking® Blogging Team, a group of folks who will be writing about some of the products and conferences offered that are related to the Social Thinking approach, based on the work of Michelle Garcia Winner. We agreed that since this is a tech-infused place, I would be featuring some of the Social Thinking products over the coming months along with a technology tie-in. This aligns well with my experience in presenting at the Social Thinking Provider's Conferences about webtools and apps that, though not designed for supporting social cognition, can easily be leveraged to that end.

The folks at Social Thinking asked us to start with Thinking about YOU, Thinking about ME: Teaching perspective taking and Social Thinking to persons with Social Cognitive Learning Challenges, 2nd Edition. This is perfect, as this book is where I would recommend anyone starting when exploring implementation of Social Thinking in your practice. Summer is a great time to pursue new avenues in your practice, or take time to deepen your knowledge of strategies you have already started applying.

I first saw Michelle Garcia Winner speak over 10 years ago, when this book was published in its first edition. One can think of it as THE core book for Social Thinking, an essential approach in working with high-functioning students with social learning issues. Social Thinking is all about language and concepts that teach students the why of social interactions. The essential ideas and strategies can be taught and then practiced in individual or group sessions, and the vocabulary related to social behavior can then be conveyed to parents and teachers for carryover and reinforcement in situations across the day. Thinking about YOU, Thinking about ME gives you an overview of social cognition and levels of functioning, but also an entry point to some key intervention strategies, such as:

- The Four Steps of Communication: concrete, universally followed steps to approaching others and "hanging out" in a group.
-Developing cognitive vocabulary (what it means to think, know, or guess) through use of videos such as the Wallace and Gromit series (I have also recommended Shaun the Sheep for this).
-Using video both as a feedback technique and as a group project to develop social behaviors in a naturalistic context.
-Social Memory and creating "People Files" about others both as an expected behavior and strategy to aid in initiating interactions.
-Specific language, visuals and goal ideas on teaching physical presence and awareness of how our bodies (and eyes!) should look when "staying with the group."
-A focus on conversational interactions through various strategies- using the "Add-A-Thought" and conversation tree, or Conversation Street Vocabulary describing how conversational behavior can mirror moves on the road.
-Social Behavior Mapping- an essential therapy tool when students have "graduated" from Social Stories™, can be used to teach any situation's associated expected behaviors and consequences.
-Strategies for building the foundations of self advocacy in students, i.e. knowing about their own IEP.

Besides providing information to get you started on all of these intervention strategies, Thinking about YOU, Thinking about ME contains another essential tool: the Social Thinking Dynamic Assessment Protocol. This is a qualitative assessment procedure I have found invaluable in the last several years.  I first started applying it in the school setting along with other colleagues, and the information provided as you work through it with students are essential to an informed assessment of social cognition (this book also provides analyses of norm-referenced assessments) and treatment planning. If you don't yet have the book, you can find some of this information (and many other free resources) on the Social Thinking website here.

That article linked above describes the Double Interview Task within the Protocol; in this task, the clinician interviews the student and makes observations of his or her conversational skills, then turns the table and asks the student to do an interview. This task is very telling! One aspect of the task involves asking the student to view and interpret personal pictures of the clinician. Can the student describe the context and the relationships between the people depicted? Does the student make "smart guesses" about you based on the pictures? Does the student recognize people shown in multiple pictures?

Here's where my tech spin on Thinking about YOU, Thinking about ME comes in. To do the Double Interview Task, you need pictures of yourself. Since many of these are exchanged electronically these days, and also to save the bother of collecting and having more materials around, you can keep your pictures in an album within the Photos app of your iPad.  Here's how you do it:

1. "Collect" your Photos

You may have a built-in collection of usable photos for this task on Facebook. Just save some where you don't have a "beverage."


Navigate to a usable picture in the Facebook app on iPad, and you can tap on the 3 Dots to save the picture to the Photos app.

If you have photos saved elsewhere, or can scan them on a computer, you can then email them to an account accessible in the Mail app on your iPad (to add Mail accounts, open Settings>Mail, Contacts, Calendars). Open the mail and tap and hold on the photo file, then choose Save to Camera Roll.


2. Organize an Album

When doing the assessment, you don't want to have to sweep through all your photos to locate the pictures you plan to show the student. You can facilitate this by creating an Album in the Photos app.

There are several ways to do this but I will show you my favorite way.
a. Open the Photos app and ensure that in the top menu, Photos is selected.
b. Tap Edit. Notice that the menu has disappeared and the words Select Items are displayed.
c. Tap the photos you want to put in your album.
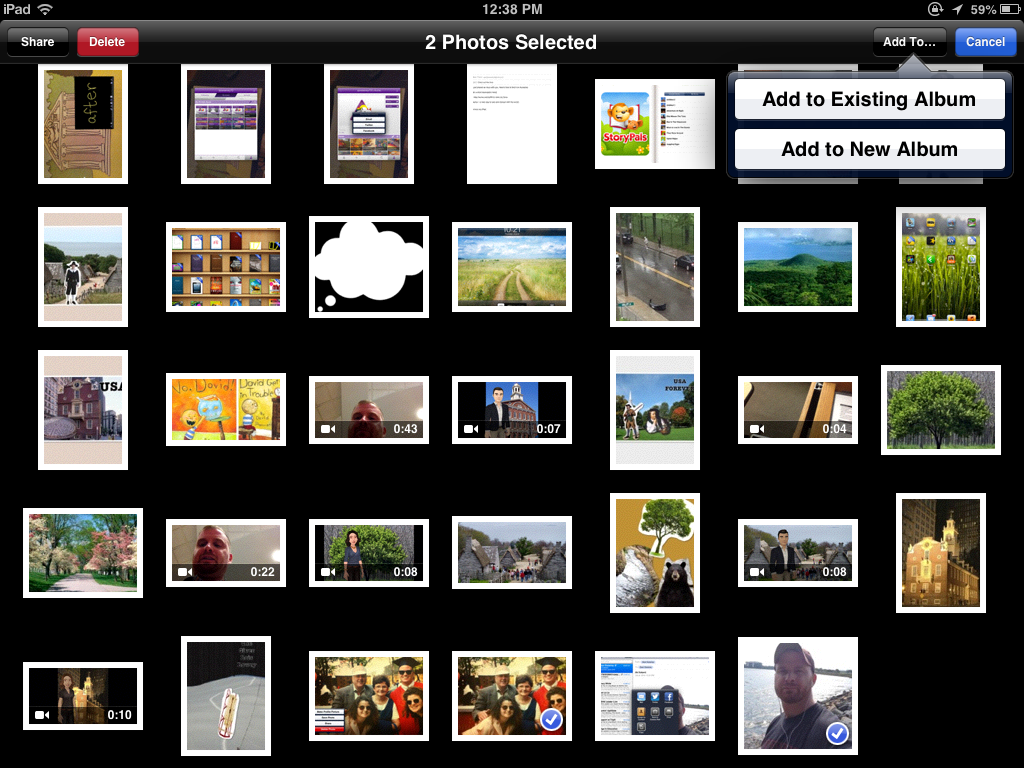
d. Tap Add To...


e. Add to a New Album and Name the Album.
f. You will then see your Album under the Albums section of your Photos app.

If you would like to see this as a video, here is a good representation of the process (after more comprehensive screenshots).

I have found having my photos on the iPad is very convenient as it helps me prepare for these assessments, and it also adds an engagement factor for the student when they are asked to view the photos on the iPad.

I hope you do explore this book when you have some time this summer!

Disclosure: Author was provided a copy of Thinking about YOU, Thinking about ME. However, I owned dog-eared copies of both the first and second editions of this book already! The opinions are all mine.
 
.